Dynamic CSS Menus Css3Menu.com

Showing posts with label SPHM. Show all posts

9.06.2010

Rainy Day Spider Solitaire – Galoshes galore!


Rainy Day Spider Solitaire is a Pogo card game based on Spider Solitaire. I’m sure by the name you were expecting it to be based off of Spades, or Cribbage. ^_~

normal mode of Rainy Day Spider Solitaire The itsy bitsy spider..

If you’ve never played Spider Solitaire, well, the rules are pretty simple. You have two decks of cards (104 cards total) and the first 54 cards are dealt into 10 piles at the top. These piles are called the foundation. The remaining 50 cards form the draw pile.

Whenever you have 13 cards of the same suit in descending order, all 13 cards go poof. (Descending order is King-Queen-Jack-10 and so on. Aces are the very last cards.) To win the game you must remove ALL of the cards.

With me so far? Good. ^_^

Unlike regular Solitaire, there aren’t any piles to put Aces and everything else. So in order to get cards in the same suit AND descending order, you have to move the cards around on the foundation.

This is where it gets tricky. You can stack cards in descending order, regardless of suit. (Example: A 5 of hearts could go on top of any 6 and nothing else.) BUT you can only move cards at the end of the stack if they’re sequential AND are the same suit.

If I have a 7 of hearts with a 6 & 5 of clubs on top of it, the only cards I can move are the 6 & 5. If I really need that 7 I’ll have to move the other cards before I can reach it.

Take a look at the picture below. The neon-green boxes highlight which cards can be moved around. Everything else is stuck for right now.

highlighted cards I guess that’s not too bad.

Now remember the 50 cards in the draw pile? You have to get rid of those cards too. Not just one card at a time either, oh no. Whenever you draw cards it’s 10 at a time; one card for each stack in the foundation. So now you have a new mess on top of whatever you managed to organize.

new deal Fudge. >_<

Empty stacks are good things because it gives you a little more freedom to move things around. But you have to have something in every stack before you can draw more cards. Boo. :(

That covers the basics of Spider Solitaire. It can be a brutal game, but luckily Rainy Day Spider Solitaire includes a few options to make things a little easier for us.


Why Rainy Day Spider Solitaire is Unique

First off, Rainy Day Spider Solitaire has 3 different modes.

  • Easy – All of the cards are the same suit. Winning is pretty simple.
  • Normal – All of the cards are divided into two suits. Winning the game is tougher, but not too bad.
  • Hard – The cards are divided into four suits now. Winning is a challenge.

To be honest, I stay away from hard mode. I get really anxious when there’s a lot of chaos and disorder around me.

hard mode in Rainy Day Spider SolitaireAck!!

Normal mode is a lot more fun in my book. ^_^ But try each mode for yourself and see what you like best.

Rainy Day Spider Solitaire also includes six extra cards, bringing the total to 110 cards. Two of the cards are “free cells.”

free cells in Rainy Day Spider Solitaire Ooooh!

Free cells will temporarily hold one card for you. If you get in a tight spot a free cell can help you get things untangled. The downside is that each free cell is a 1-time use only thing. Also, they’re in the deck like regular cards, so you have to wait until you’re dealt a free cell before you can use it.

In other words, don’t count on a free cell being there when you need it. Keep it strictly an emergency use thing. You’ll also get a small token bonus for any free cells left at the end!

The other four extra cards are “scratchers.”

scratchcards in Rainy Day Spider Solitaire Big money! Big money!

As you can see, each one is divided into 4 squares. Pick a square to scratch and you get whatever prize is under it. (Always tokens.)

scratched off scratchcards in Rainy Day Spider Solitaire Woohoo!

The scratchers vanish as soon as you scratch them. They’re just a nice little bonus. ^_^

Rainy Day Spider Solitaire also includes an 11th “free” column.

free column locationBonus!

You can put whatever you want in this column, as long as it’s a legal move. (Like putting a 10 on top of a Jack. You couldn’t put an Ace on top of a 4 though.)

If you manage to win without using the free column you get a bonus. It’s 5 tokens on easy, 25 in normal, and uh… more than 25 tokens in hard mode. I didn’t win a hard game, okay? *^_^*

Also, in the bottom right corner you’ll see 5 piles that say “Draw” on them. The card on top of each pile will land on the leftmost stack. You won’t know what the other 9 cards are in each pile until you click, but it’s still nice to at least know what one card is. ^_^

Still, I think the best feature in Rainy Day Spider Solitaire is the Undo button. There is no penalty for using it!! Whenever you have multiple choices you can use the Undo button to figure out the best option. For example, let’s say you have two 6s of diamonds and one 7 of diamonds. Which six should you move? Many times moving even just one card frees you to make other moves. You can follow the trail as far as you want, then use Undo to back up ‘til you have to pick a 6 of diamonds again.

It’s wonderful, but it has limits. You can’t undo a draw or clearing a set of 13. Look carefully before you commit!


Tips & Tricks

Start with the highest value same-suited cards and work your way down. Not sure wha tI mean? Let’s try a normal mode game together. ^_^

normal mode demo Now what?

We have a few options here, but we’ll start with the easiest things first. We’ll click on the free cell card, move the 9 of diamonds to the 10 of diamonds, and the 6 of diamonds to a 7 of diamonds.
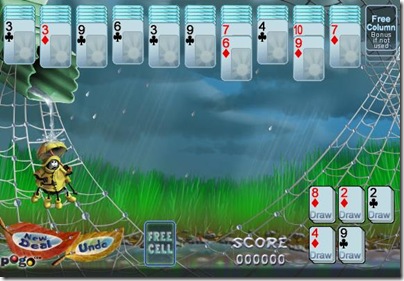
normal mode step 2 Hmmm.

Fewer options this time. We have two 3s of clubs and only one 4 of clubs. We’ll use the Undo button to try both options and figure out which one is best.
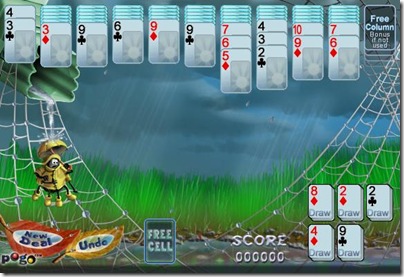
normal mode step 3 Wait wait! I blinked and missed it!

Sorry, I didn’t want to show every single step along the way. *^_^* If you’ll notice, right now everything is still in suited groups. If we want to get to some of the cards buried at the top (and we do), then we’ll have to make some mix-suited stacks.
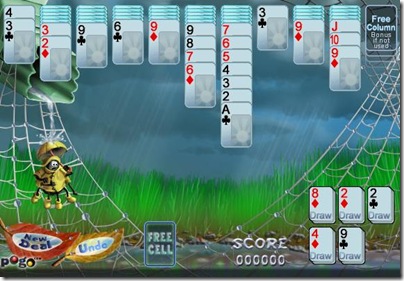
normal mode step 4 Are you sure that’s safe?

Be very careful when making mix-suit stacks! Remember that you’ll eventually have to draw more cards, and they can throw your perfectly orchestrated hand into chaos.

Looking at the top card on the draw piles, I’m going to pick the one with the 8 of diamonds on top, since we already have three 9s of diamonds.
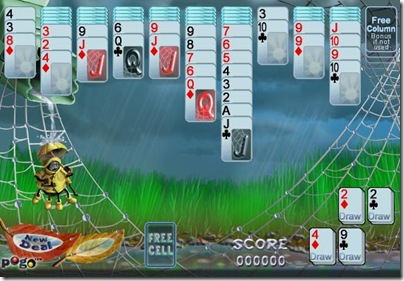
first draw normal mode The aftermath.

Things are a little messy, but not too bad. You can probably see several new moves. ^_^ Just keep working with the suits as best you can. Try to “clear” a stack as soon as you can. You can put anything you want in an empty stack, so long as it’s a legal move. Use empty stacks to move card groups around.

If you’d like more help with Rainy Day Spider Solitaire, check out the Badge Hunters forum or these articles on BadgeHungry!


Final Rating

I’m not a huge fan of Spider Solitaire games in general. But I have to admit, Rainy Day Spider Solitaire is the cutest one that I’ve played. For every complete suit (13 cards) you remove, a ray of light appears. If you win the game the sun comes out and the spider is all happy.
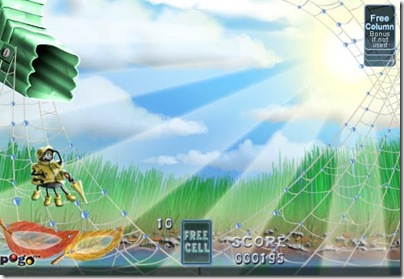
the sun! Awww!

Come on! That stuff is CUTE! ^_^

I like that there are 3 difficulty levels and the bonus features (free cells and the free column) are quite nice, but… I still don’t love this game. I rate it 3.5 stars out of 5.

What would you rate it? Do you have any Spider Solitaire tips to share?


Similar Games

If you’re looking for fun card games, give some of these a try.

9.04.2010

A Glorious World – Bouncy bouncy bouncy!


Did you know that I collect bouncy balls? I do. ^_^ That one reason why I like A Glorious World! It’s a pinball-like game available at Playtopia, but the balls bounce around like rubber!

main menu for A Glorious WorldThe story is that Gloria, an angel, has had so much fun throwing balls at pins that she lost her wings and her halo! You can help her get her halo (and wings) back by playing the game with her. ^_^

easy pattern for A Glorious World Ooooohhh!

The tutorial is very good and worth going through. But here are the basics: You launch red rubber balls from this thing.

launching pad Uh… how?

It works like a slingshot. ^_^ You click on the circle and drag in the opposite direction of where you want the ball to go.

ready to fire! Umm. Okay?

In the above picture I dragged my cursor to the right, and the ball will fire to the left. Watch the directional arrows if you get confused.

Once you let go the ball will bounce around the board and hopefully hit some pins. Your goal is to to clear the board of all the colored pins. (The tiny grey ones add to your score, but you don’t have to remove them to finish the level.)

  • Yellow pins – Vanish with one hit.
  • Red pins – Needs two hits to vanish.
  • Green pins – You have only a few seconds to hit ALL of the green pins on the board. They’ll vanish as a group once each pin has been hit.
  • Purple pins – A group of purple pins orbit clockwise around a central purple pin. You can’t remove the center pin until the orbiting pins are removed.
  • Blue pins – Ugh. >_< These have 3 different colors, and each time it’s hit it will change colors. When all of the blue pins are the same color they’ll vanish as a group. These are the most annoying pins ever.
  • Locked pins – These are yellow with a keyhole on them. ONLY yellow “lock” balls affect them.

Whenever you clear a group of the same-color pins, you get +5 balls! There’s a checklist in the bottom left corner if you need help keeping everything straight.

level checklistIn this case the board only had three different pin colors. And the thing on the bottom? That’s what your reward will be if you finish the board! You can get letters, (spell S-P-I-N for a jackpot spin), 5 or 10 extra balls, 50-100 tokens, or a halo! Collect seven halos to enter the bonus round. ^_^

There are a total of seven different areas to unlock. Each area has unique pin patterns to conquer.

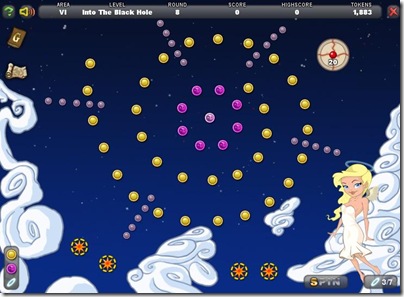
area six in A Glorious World Stars!

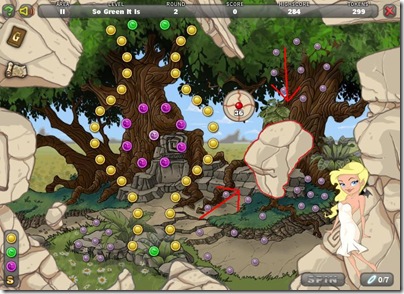
Some areas have obstacles that you’ll have to shoot around. It can be tricky!

area 2 in A Glorious World Floating boulders are such a burden.

In “normal” mode you start with 30 balls, and you keep any extras from each round. In “expert” mode you start with 15 balls each round, and it resets back to 15 after each board. Eek!!

There’s also a highscores mode where you can pick which board you want to play. Right now I can look at it, but I can’t play anything. Not sure how to unlock it just yet. ^_^


Bonus Round

The point of the entire game is to collect halos. Once you have seven of them you’ll unlock the pearly gates!

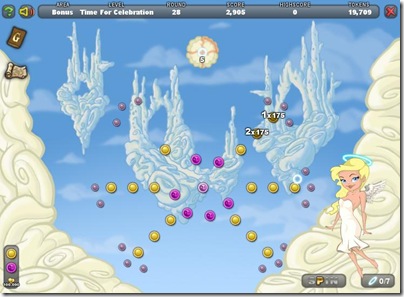
bonus level Simply divine!

In the bonus round each pin is worth a LOT. The downside is that you use the halos to throw at the pins, so you only have 7 shots!!

throwing halos Rollin’ rollin’ rollin’. Keep them halos rollin’!

I must admit, throwing the halos is pretty cute, AND fits into the story quite well. ^_^ Gloria is so addicted to this game that she’ll lose her halo and wings over and over again just so she can play!

If by some miracle you manage to clear all of the pins in 7 shots, you’ll win 100,000 tokens!!

I haven’t found anyone yet who’s done it, so good luck to you. ^_^ You’ll probably grab around 10,000 tokens in the bonus round, and that’s not too bad either!


Diary Pages

Gloria has 10 pages in her diary, and each one can only be unlocked after you reach specific goals. Once you unlock them the bonus sticks around forever!

Page 1. Finish training - Unlocks diary

Gloria's diary

Dear Diary – Today I became a fallen angel!

Page 2. Reach round 5 - Unlocks world map

area map Okay, take a left at the giant tree..

Page 3. Finish a level in under 40 seconds - Gain ability to launch 4 balls in a row

4 bouncing balls at once Those are the things in the neon-green circles.

Page 4. Finish a level in under 25 seconds - Increased chance to launch a “special” ball. (Special balls are unlocked in other pages.)

Page 5. Hit at least 25 pins in one shot – Unlocks the “Bingo Ball.” When a ball appears with a number on it,  you need to make that ball remove exactly that many pins. If you do that you’ll get a reward of 1,000 tokens!

bingo ball Bingo!

Page 6. Hit at least 35 pins in one shot – Reward unknown

Page 7. Use 5000 balls total - Cow ball will randomly appear. Gives you extra tokens per pin.

Cow ball. Really! Moo!?

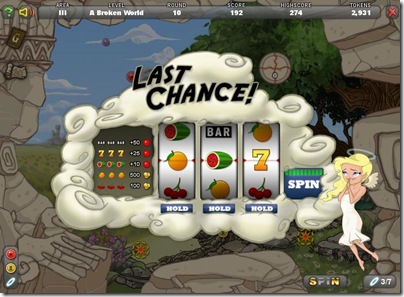
Page 8. Complete a bonus round in heaven – Get the Last Chance slot machine! When you run out of balls you have 10 spins to try and get more!

Last Chance slot game Ohpleaseohpleaseohplease!

Page 9. Reach round 75 – Reward unknown

Page 10. Save up 100 balls – Reward unknown

If you know what the rewards are for pages 6, 9, and 10, please tell me. ^_^


Medals

In addition to unlocking special abilities in the diary, A Glorious World also has four medals to earn! Each one has a reward in tokens, and you can earn each medal only once.

  • Basic Glorious World – Use 500 balls and complete 25 rounds to earn 10,000 tokens.
  • Expert Glorious World – Use 2500 balls, complete 50 rounds, and win 2 gold trophies for 25,000 tokens.
  • Heavenly – Use 10,000 balls, complete 150 rounds, win 10 gold trophies, and reach level 50 in a normal game for 100,000 tokens.
  • Halleluja – Use 50,000 balls, complete 1,000 rounds, earn 50 gold trophies, reach round 100 in a normal game and round 50 in an expert game for 250,000 tokens!!

I love having a good challenge to work on. ^_^ Here’s my progress so far.

A Glorious World medals Nice!

If I was on Playtopia I could mouse over the incomplete medals to see a little checklist of what I still need to do.

medal progress Like this?

Yeah. Like that. ^_^


Tips & Tricks

1. Aim for the pins at the top and work your way down. By the time you clear the top pins you’ll probably have most of the pins on the lower levels already taken care of.

2. It’s REALLY fun to pull back the slingshot as far as it will go. Everything bounces around and it’s wild. ^_^ Unfortunately, it’s not terribly effective. (Drat.)

When you use less force the ball will usually stay in a smaller area. Most pins are grouped together, so this is a good thing. Generally you only need to use full force for pins that are extremely far away.

3. Good news! When you lose a game you get to keep any halos that you scored! As long as you keep the game window open, the halos will stick around.

4. There are at least 2 rounds where you’re really playing pachinko. The “lock” pins are nestled closely together, and the regular pins are below (or buried in) them. If you’re lucky, you’ll get a few “key” balls to clear the mess. But more than likely you’ll have to gently drop the balls between the pins, and hope they hit the right ones. Once the regular pins are gone you’ll get all “key” balls and it’s pretty easy from there.

You’ll need a lot of patience here. Take breaks if you need to. And expect to lose a LOT of bouncy balls on those blasted boards. >_<

5. The one exception to my “work from the top down” rule is the blue pins. If I see that 3 out of 4 are the same color already, I’ll go ahead and try to make the 4th one match up. Sometimes you get lucky and the random bouncing takes care of them for you. Other times you may waste 10-20 bouncy balls on those darn pins!


Final Rating

When I first started playing A Glorious World, I ended up staying WAY too late. *^_^* It just was too fun!! Bouncy balls flying everywhere, pretty colorful pins to collect, and an adorable angel cheering me on! Weeeee!!!!!

Then I got to the pachinko levels, and my joy died. The majority of this game depends on skill and finesse. Relying on plain luck (and having it fail repeatedly) isn’t very fun.

Luckily, those boards are pretty rare, so I’d say this is still a good 4 out of 5. ^_^ Give it a shot and let me know what you think!


Similar Games

If you like A Glorious World, you might like some of these games too!

7.21.2010

Treasure Hunter - A true gem.


Treasure Hunter is a beautiful game from Spigo. It's also incredibly addictive. The first time I played it I stayed up until 6 am!! *^_^*

Unlike Turbo 21, (which is addictive because it's so dang fast) Treasure Hunter is addictive because it's simple to play, but hard to master. It's an intriguing cross between Tri Peaks Solitaire and Diamonds. There is a clock, but you can play at your own speed. No rush. ^_^

Let's dig in, shall we?


The Cards (Part 1)

The deck is a standard 52 cards. You start with a pattern in front of you, a stack of cards face down, and one card face up all by its lonesome. This is the "waste" pile.

What a waste. *Ba-dum-bum CHING!*

The goal is to clear the pattern of all cards. Any card that is one rank higher or lower than the top card of the waste pile can be moved to the stack. Suit doesn't matter. It then becomes the *new* top card on the waste pile. ^_^

In the above picture I could put either a 5 or a 7 on that 6 of hearts. If I played a 5, then I could play either a 4 or 6 on top of it. With me so far? Good!

Now in this game, having the runs is a good thing! A run is when you play several cards in succession before you get stuck and have to flip over a card from the stack.

Just looking at the cards showing, I would play them like this:

5-4-5-6-7-8-9-10-J-Q

A run of eight isn't a bad start! As you keep playing you'll learn how to make longer runs. It takes practice. ^_^

If you remove all of the cards in the pattern before you run out of cards in the stack, you win the round! Woohoo!! But if you still have cards on the table when you flip over that last card in the stack, it's game over. Back to round 1 for you. :(

Oh, and did I mention that there are dozens of patterns?

Whoa...

Oh yes. ^_^ Dozens and dozens of different patterns. Some are harder than others, but I love the creativity!

Woof!

You never know what you'll get. It's great. ^_^


The Cards (Part 2)

Now that we've focused on the numbers and how to make runs, it's time to explain this part. You may have noticed it lurking in the upper right-hand corner.

What is that?

This is your jewel box, and this is where the colors of the cards come into play. You start out with four colors: Red, yellow, black, and blue. Any time you play two cards of the same color in succession on the waste pile, a jewel of that color falls into the jewel box.

For example, if you played a red Ace on top of a red King, a red gem would fall into the box. If you played a black Ace on top of that red King, no gems would appear.

Let's say you continue the run of red cards. For each additional red card you would get another red gem in the jewel box AND one swap! Swaps are used in the jewel game, which I'll explain in a moment. ^_^

As you progress through the rounds you'll get more and more colors to work with!
  • Round 5 - Pink
  • Round 9 - Grey
  • Round 13 - Purple
  • Round 17 - Green
Once your jewel box is full and after you finish the current round, you get to play the jewel game!


The Jewel Game

When the jewel game starts the jewel box will take center stage. It's much easier to see that way. ^_^ Your jewel box may look something like this.

Um.. Now what?

This is where the Diamonds aspect comes in. Your goal is to turn all of the tiles gold. And the only way to do this is by getting three (or more) same-color gems in either a row or a column. Diagonals don't count.

When you make a match the gems vanish, more gems fall down, and the tiles behind the match turn gold.

Ah. A work in progress.

And this is where the swaps come in! Every time you move a gem it's one swap. Unlike Diamonds, the gems don't have to create a match 3 in order to swap them. In fact, sometimes it may take 3+ moves to get gems in the right spots!

For each round of cards you complete, you'll get a few swaps. The amount of swaps you get depends on how many Big gems you have. (More on that in a moment.)

  • 0 Big gems = 2 swaps per round
  • 1 Big gem = 3 swaps per round
  • 2 Big gems = 4 swaps per round

These swaps definitely help, but you'll usually get the most swaps from the cards. (Remember, each same-color card played after the 2nd earns a gem and a swap! A run of five same-color cards earns four gems and three swaps!)

Unless you have a ton of swaps banked, or a really awesome board, you'll probably run out of moves before the puzzle is completed. That's okay! Go back to the cards and try to earn more swaps. But most importantly, you must survive the round of cards to get back to the jewel box! If you lose then it's back to round one, and the jewel box empties.

Which really sucks. >_<

Let's be positive and say that you finish a jewel box. ^_^ What happens then?

Well, the most common gems left on the board will fuse into one BIG gem!

Pretty!!!

The new Big gem floats down the screen and settles into a piece of jewelry.

What is that? A decorative comb?

Once you have three Big gems you earn a jackpot spin!! Sometimes it takes a while to earn those Big gems. A long while.

Oh! And there are several jewel box patterns too.

Ooohh!!

Just to, ya know, keep you on your toes. ^_^

Nice!

That one is my favorite, but I rarely get it. =(

IMPORTANT: Once you make a Big gem you will not lose it! Even if you die on the next round, you'll still have that gem. *Whew!*


Jackpot

Once the jewelry is complete and you have three Big gems, you get a jackpot spin! The cash prize is a progressive jackpot with a max pot of $200. Spigo (like most sites) doesn't post the odds for winning, but you can assume the odds aren't great.

Since you probably won't win the cash prize, you want to win the most Spigos possible, right? But isn't the reward random?

It's true that the spinning is random and you don't know where it will land. However, the Spigo awards are not random! They're based on the the gems in your jewelry! It's a little tricky to explain, so just stick with me.

When you start the game and have zero Big gems, the jackpot "wheel" looks like this.

That's not very exciting.

That neon green box is the max Spigo award. When you get your first Big gem, the values change!

Oooh! That's much better!!

Here is the max Spigo award for having one of the following gems:
  • Red gem = 10,000 Spigos
  • Yellow gem = 12,500 Spigos
  • Black gem = 15,000 Spigos
  • Blue gem = 17,500 Spigos
  • Pink gem = 20,000 Spigos
  • Grey gem = 22,500 Spigos (unconfirmed)
  • Purple gem = 25,000 Spigos (unconfirmed)
  • Green gem = 27,500 Spigos (unconfirmed)
At the end if you have three different color gems, Treasure Hunter goes by the gem that is worth the most. For example, if you had a yellow, red, and blue gem, then your max Spigo award is 17,500.

If two of the gems are the same color, then the max Spigos are doubled! Two blue gems means a max pot of 35,000 Spigos!!

Sweet!

Now if you have three gems the same color, the Spigos are tripled! Three blue gems would have a max pot of 52,500 Spigos!! Sorry, no pictures of it. Getting three Big gems the same color is really hard. o_O

Remember, you're not guaranteed to win the max Spigos pot. But you have some control over what it will be!


Badges

All Spigo games have four different badges to earn. Each badge has a 1-time prize of Spigos. (Darn.) For Treasure Hunter, these badges are:
  • Bling bling - Collect 20 large jewels for 10,000 Spigos
  • The sophisticated jeweler - Get a jackpot spin with 3 identical gems in the jewelry for 25,000 Spigos.
  • The persistent archaeologist - Get to round 35 and achieve a run of 20 for 50,000 Spigos!
  • I want one of each! - Get a large jewel of each of the 8 possible colors for 200,000 Spigos!!
These are some tough challenges! On the upside, most of the challenges are spread across several games. Want to see my progress? ^_^

I guess that's not *too* bad.

Yes, despite my mad skills, I only have two of the badges. My longest run was 31, so "The persistent archaeologist" badge is halfway done. But I've never made it past round 17. Yipes.

I've said it before and I'll say it again. I love challenges!! ^_^


Tips & Tricks

1. The hard part about this game is learning to balance runs (5-6-7-6) with matches (red card-red card). If you focus on runs you'll fly through the rounds, but it will take ages to fill up that jewel box. Conversely, if you focus on matches you may not even survive the first round!

This is what most people get stuck on. Runs vs. matches. But really, there's a third factor that's extremely important. Revealing cards.

If you're almost out of flips and you have one card holding down a pile three cards deep, you're pretty much screwed. It's not impossible to win, but it's nearly impossible. ^_^

I now combine all three factors, in this order.
  1. Revealing as many cards as possible.
  2. Making matches that work for the jewel box pattern.
  3. Clear as many cards as possible with each run.
Let me show you my least favorite pattern. ^_^

Eek!

As you can see, there are only two cards face up in this pattern. Each of those cards have a whopping fifteen cards pinned under them!

With this pattern I focus completely on revealing cards. I'm in complete survival mode. *^_^* Let's say I've worked through it a tiny bit and have revealed a few more cards. In this scenario I have two options. 1. A run of two, which would make a match AND reveal one card. Or: 2. Play a single card that would reveal one card which is also pinning other cards.

Option 2 is the better choice. The cards at the bottom of that pile are going to be hard to get to, and I don't want to wait until I'm almost out of flips!

Since I changed my strategy I haven't died on this pattern a single time. I don't get many matches, but I make it to the next level. Previously I focused solely on runs and matches, and this pattern killed me almost every time.


2. Making matches work for the jewel box is something that I'm still not great at. *^_^*

New gems fall from the left and fill to the right. This means you can plan your jewel box puzzle before you get to it! Making every match you see *will* fill the jewel box quickly, but the result may be such a mess that it takes 50 swaps to complete.

Look at the shape of the jewel box and think about where the next gems will fall. Maybe you want to avoid a match of red cards to wait for a match of blue cards. It's another aspect to consider.


3. Avoid speed clicking. When you're tired, it's very easy to absently flip through cards. Then omg, wait!! That was the card you needed!! But you flipped right past it and there's no undo button. It sucks. Get in the habit of flipping cards slowly, especially on troublesome patterns. That one card can make or break you.

However, if you're so tired that you can't hold your head up but you can't stop playing because you REALLY want that 3rd gem... Go to bed. You'll make silly mistakes and get frustrated if you push it. Get some sleep and tackle Treasure Hunter tomorrow. ^_^


4. The first three times you play Treasure Hunter, you'll get wonderful, helpful tips as you play.

To be honest, they usually annoy the tar out of most people. These helpful tips stay on the screen far too long and cover up the cards. (Tsk! Bad design!) Oh, and each time you clean out your cookies, you'll have to go through the annoying tips again.

The easiest thing to do is close and reopen the game four times. On the 4th try you'll be helpful-hint free and can actually play! ^_^


Final Rating

There is a reason that Treasure Hunter is Spigo's most popular game. It's difficult and yes, often frustrating. But when you finally get that jackpot spin... What a rush!!

Every time I sit down to play Treasure Hunter for "just a few minutes," I end up playing for well over an hour. The variety in patterns means that each game is a new experience and a unique challenge. I love that. ^_^

Graphically, there are several small details that really stand out. The steam from the cup of coffee, and the reflection from the glasses both amaze me. Those two items aren't used in any way, but they're beautifully rendered. Things like that are a really nice touch on an already great game.

I say it's 5 out of 5 stars. What would you rate it?


Similar Games

If you like Treasure Hunter as much as I do, then you might like some of these games too. ^_^
  • Merry Poppings at Slingo - Make your way through 10 levels with 9 different types of balloons designed to help and hinder you! (Harder than it sounds.)
  • Pyramid Solitaire at iWon - Find pairs that add up to 13 and clear the Pyramid!
  • Diamonds at Spigo - Move gems into matches of 3+ and watch the Spigos fly!


6.10.2010

Flushee - 5 Bears in the bed and the little one said..


Flushee is an adorable game from KadoKado. It's a new site I found thanks to mbif, and it's great! A full site review will come later, but for now, just know that it was originally a French site, and not all of the games are translated. Also, you get 4 free game plays per day. *^_^* (They have lots of games though!)

I can't link you directly to Flushee, but you can make a demo account to check it out, if you want!

Flushee falls into the SPHM category. (Simple to play, hard to master.) You have a grid full of jelly-like creatures, and you have to squeeze one more at the end of a row.

Awww! Cute! ^_^

This pushes the ENTIRE row of jellies over. (Which means that one falls off the end.) Any jellies that form a group of 4 or more will explode! This is how you earn points. ^_^

I have a sudden craving for lime jello.

The jellies above will fall down, and if *they* form a group of 4+ then they'll explode too! This is called a "chain," and it's a good thing. Make as many chains as you can!

Now, the tricky part of Flushee is that you only have 10 moves per game! If you're lucky you may find an extra piece or two to help. To "activate" these pieces you have to push them off the board!

Mmm... Peaches!

That's a peach that I just pushed off. It's worth 1,000 points AND adds one move! So don't waste 3 moves trying to push one over the edge.

Next we have the rare Spiral Token!

I don't see it.

Pushing this piece over the edge earns you up to five moves! Woohooo!


Earning Kado Points

Whenever you play a game, you accept a challenge. (They call it a "contract," but I think that sounds scary.) The challenge is a random score, and if you beat the score then you get Kado Points!

Ooooohhhh!

The score to beat is different each time, as are the Kado points. I've had challenge scores ranging from 4,000 to 24,000, and Kado points ranging from 3 to 100+!

You can also earn Kado points by earning a Green, Orange, or Pink star.

Yay!!!

Think of stars as trophies. ^_^
  • Green star - Need to score 12,000. Worth 10 Kado points!
  • Orange star - Need to score 17,000. Worth 50 Kado points!
  • Pink star - Need to score 21,000. Worth 100 Kado points!
Stars are automatically cashed in at the end of a Kalendar period. (2 weeks.) You can only have *one* star per game, so aim for the best!

Also, if you're ranked in the top 400 players at the end of the period, you get 100 Kado points. ^_^

I totally beat that.

The top 400 scores will change during the 2 weeks, as players reach higher scores. So if you're concerned about rank, check back often!


Tips & Tricks

Work from the bottom. You'll trigger more chains this way and score more points. ^_^

Whenever you push a jelly into a row, you get a new jelly. This jelly is not random! It's the jelly that fell off the end of the row! If you remember this, you can plan a few moves ahead.

NEW TIP!

If you have a lot of fruit on the screen and a few moves left, try to get the fruit onto one line. This will save you moves because as one fruit falls off, you automatically get another move.

Oh! I get it!

Essentially it's a chain of free moves. Give it a shot. ^_^


Final Rating

Confession time: I actually purchased some Orange gems so I could keep playing Flushee at KadoKado. *^_^* On the upside, they never expire! On the downside, I went through more Orange gems than I care to admit. *Sheepish grin.*

I'm a cheap gamer, and I REALLY like Flushee! The games are fast, and I love the different challenges for each round. Very fun! I see myself coming back to this one a lot. ^_^

5 out of 5 stars!


Updated 7/24/10 with a new tip.
 

Free2WinGames.com Copyright © 2010 Flower Garden is Designed by Ipietoon for Tadpole's Notez Flower Image by Dapino

All images used in posts are Copyright of their respective designers, including (but not limited to):
BugleGames, Candystand, Club Bing, FreeSlots, Gamesville, GSN Oodles, IWON, KadoKado, Playtopia, Pogo, Slingo, Spigo, and Winster.